Guide to Deploying a Web Application on AWS EC2
This guide will walk you through the steps to deploy a web application on an Amazon Web Services (AWS) EC2 instance, covering everything from instance creation to configuring NGINX as a reverse proxy.
- EC2 Instance Creation on AWS
- Establishing Connection to the EC2 Instance
-
Installing Essential Tools
- NGINX Web Server
- Node.js Runtime Environment
- MongoDB Shell (Mongosh) for database interaction
- PM2 for Node.js Process Management
- Preparing the Application for Deployment
- Configuring NGINX as a Reverse Proxy for the Application
The application we’ll be deploying consists of a React.js frontend, an Express.js backend, and a MongoDB database.
1. EC2 Instance Creation on AWS
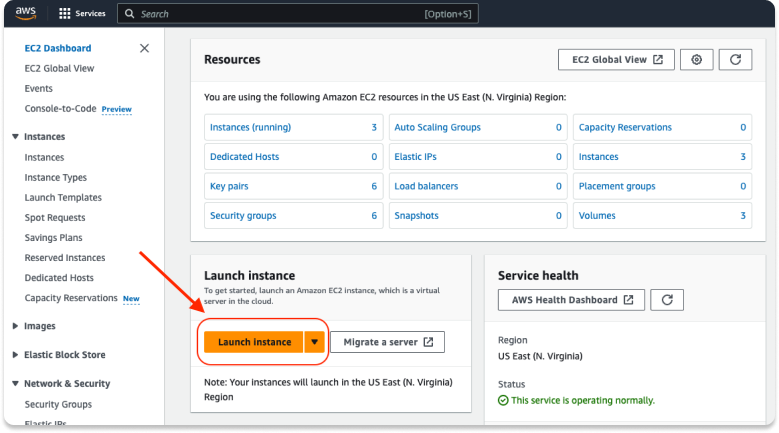
In your AWS account, search for EC2, select your preferred region, and click the Launch Instance button.
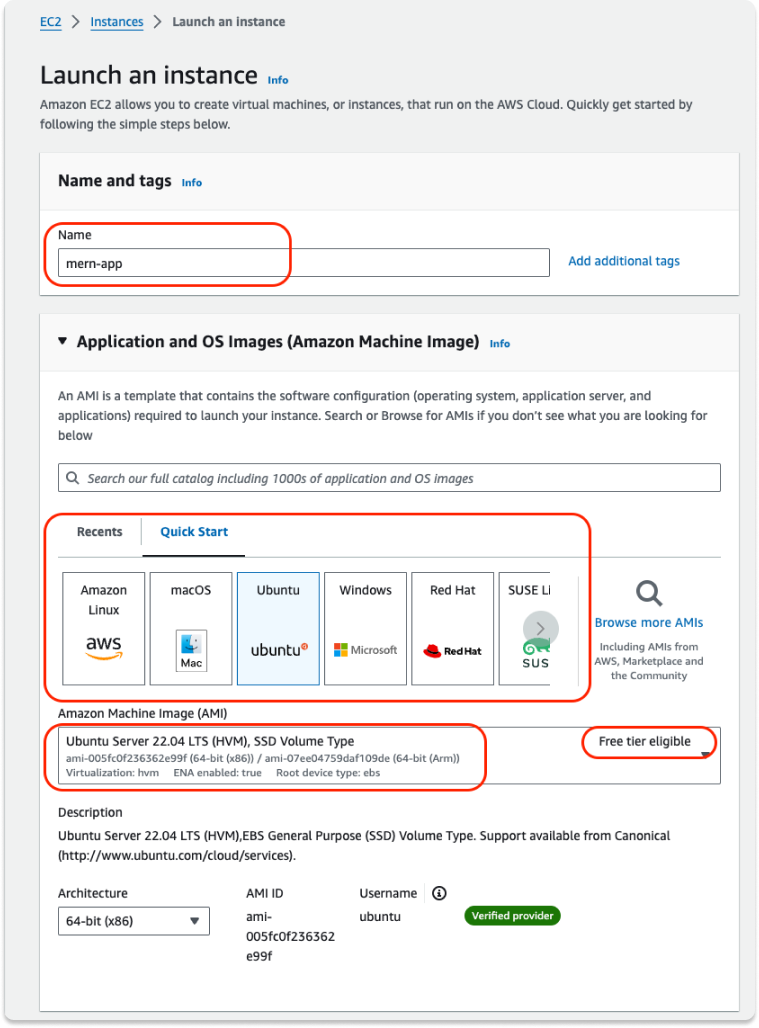
In the "Launch an Instance" window, name your instance and select an AMI. For this project, I'll be launching an Ubuntu instance. Choose "Ubuntu Server 22.04 LTS (HVM), SSD Volume Type, 64-bit (x86)," which is eligible for the free tier.
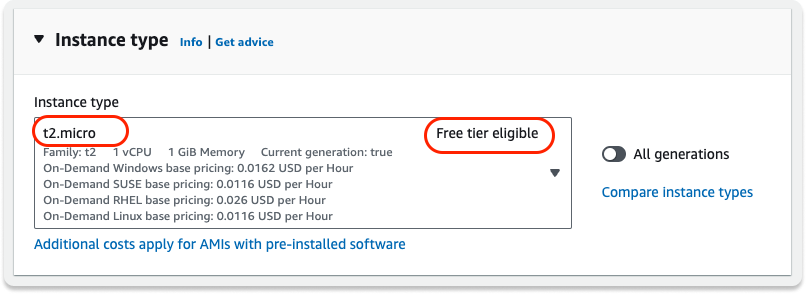
In the instance type window, select t2.micro, as it is eligible for the free tier.
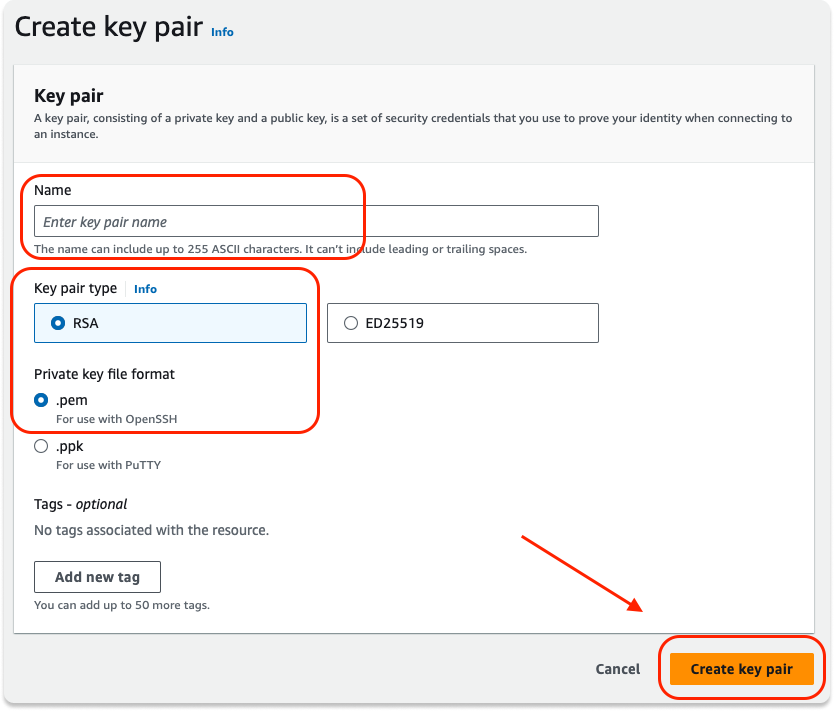
In the Key Pair section, choose an existing key pair or create a new one. If you decide to create a new key pair, you will be prompted to save it after clicking "Create Key Pair." Make sure to store it in an accessible location.
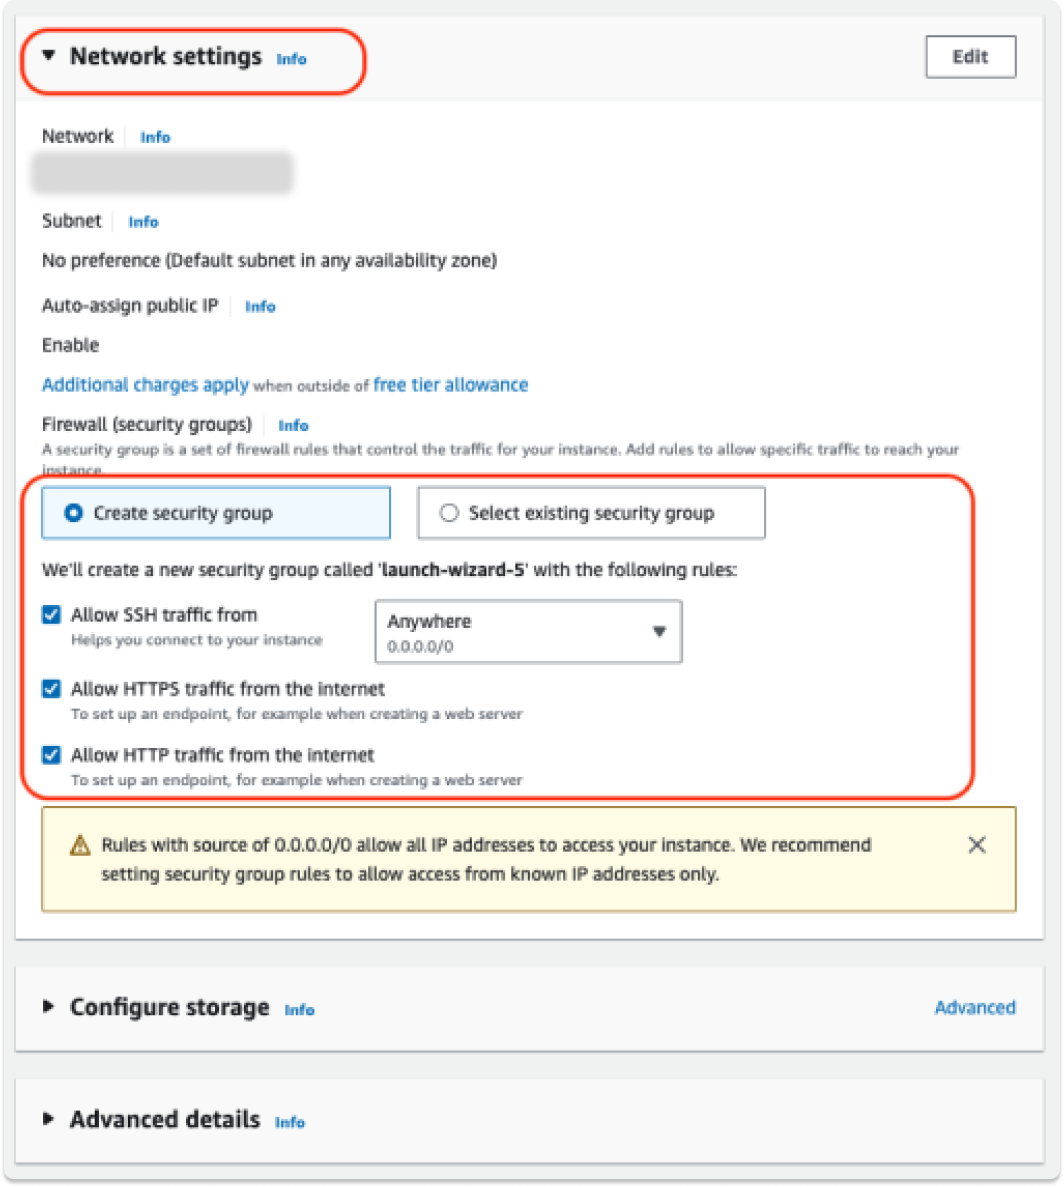
In the Network Settings section, under Firewall (Security Groups), click on Create Security Group. Ensure that "Allow SSH traffic from" is checked. This enables connections to your EC2 instance from your local machine via Port 22 using an SSH client. Additionally, for testing purposes, allow all HTTP and HTTPS traffic.
While it's acceptable to allow all traffic in security groups during testing, make sure to configure them properly once testing is complete, as access to the database should be restricted.
Leave the remaining configuration at its default settings and click Launch Instances. Once the instance is launched, it will appear in the list of instances with a status of Running.
2. Establishing a Connection to the EC2 Instance
Before connecting to your EC2 instance, you need to run the following command in the terminal. This command will change the permissions of your key file so that it is only readable by you. If you do not run this command before connecting, you will encounter a "permission denied" warning, indicating that the permissions on your private key file are too open, which poses a security risk.

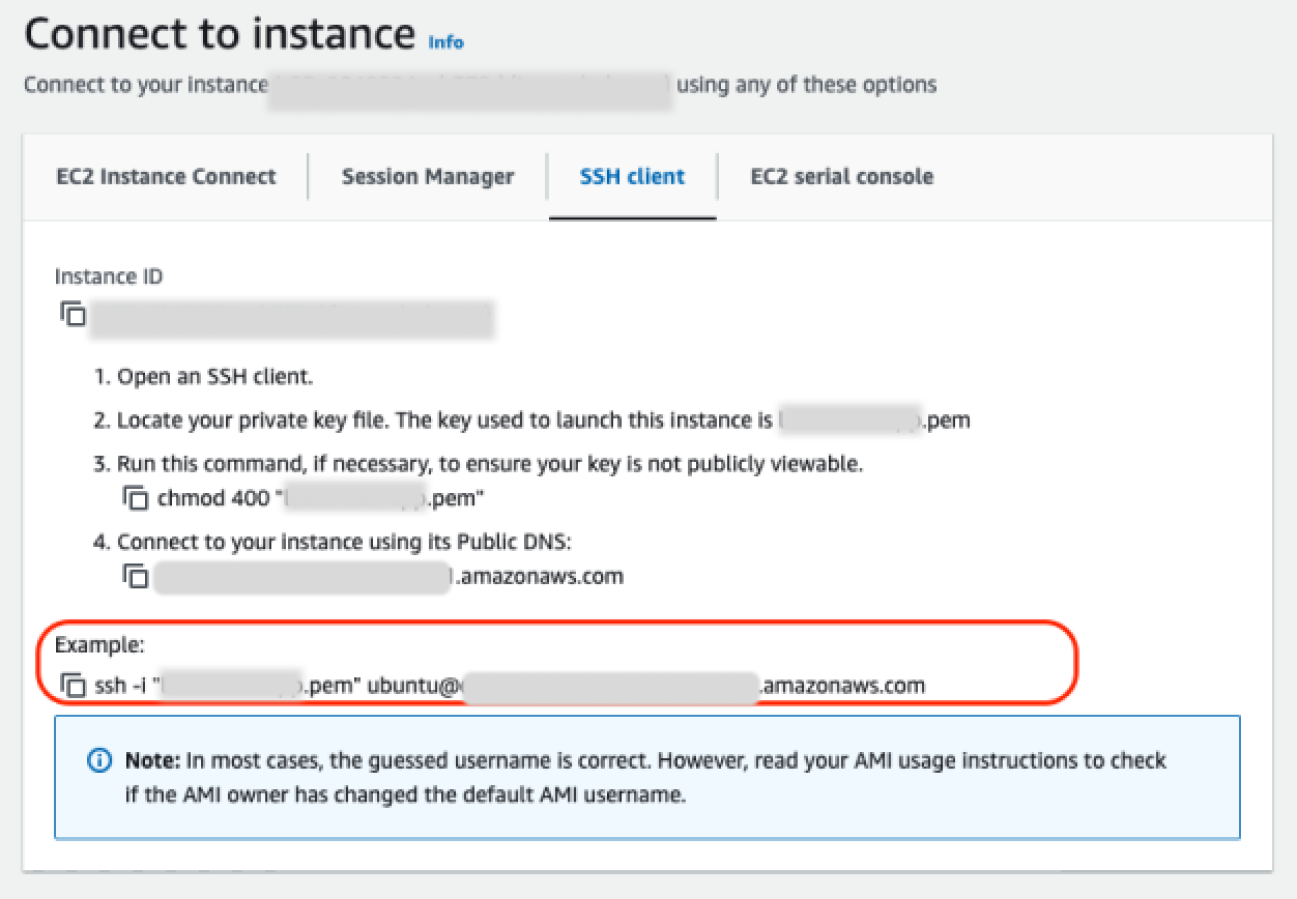
After running the command, go to the AWS console, select your newly created instance, and click the Connect button in the top right corner. This will open the “Connect to instance” window, where you will find several options for connecting to your instance. I will use an SSH client for this connection.
To connect to the EC2 instance, copy the example command provided to you and paste it into the terminal .
Congratulations! You have successfully connected to your EC2 instance.

3. Installing Essential Tools
Now that we are logged into our EC2 instance, we need to set up the environment for the application we will deploy. Since we will be running a MERN stack app on this EC2 instance, the first step is to install Node.js to prepare the environment accordingly.
Before we begin the installation process, we need to update the package index.

The command is used in Debian-based systems (like Ubuntu) to refresh the list of available packages and their versions from the repositories. Running this command retrieves the latest package information, allowing you to install or upgrade software reliably.
Installing nginx
Nginx is a high-performance web server that also works as a reverse proxy, load balancer, and HTTP cache. It's widely used to serve websites and handle large amounts of traffic. Here’s a breakdown of what it does:
- Web Server: Nginx serves web content like HTML pages, images, and videos to users' browsers. It's very efficient at handling a large number of simultaneous connections, which makes it popular for high-traffic websites.
- Reverse Proxy: Nginx can act as an intermediary between clients and servers, forwarding client requests to the appropriate server. This helps distribute traffic and ensures efficient communication.
- Load Balancer: Nginx distributes incoming traffic across multiple servers, preventing any single server from becoming overwhelmed. This improves reliability and uptime.
- HTTP Cache: It can cache content to reduce the load on servers by serving cached versions of web pages or other resources, improving website speed.
Execute the following command to install NGINX on your EC2 instance.

Once NGINX is installed, it will take control of the public IP address. Click on your instance and open the public IP address in your browser. You should see the “Welcome to NGINX” message on the screen.
This indicates that NGINX has been successfully installed and is functioning as a reverse proxy.

We will configure the NGINX web server later.
Installing node.js
To install Node.js, run the following commands:

Once the installation is complete, verify that Node.js and the npm package manager are correctly installed by running these commands:

These commands will display the installed versions of Node.js and npm, confirming that the installation was successful.
Installing PM2
PM2 (Process Manager 2) is a robust process manager designed for Node.js applications, providing essential features for reliable and efficient application management.
It allows you to run applications as background processes with automatic restarts in case of crashes, supports clustering for load balancing across CPU cores, and offers real-time monitoring and logging of CPU and memory usage.
PM2 also simplifies deployment workflows for production environments and ensures minimal downtime by automatically restarting applications after failures or server reboots.
To install PM2 globally, use the command

Setting up MongoDB - Installing Mongosh (MongoDB Shell)
1. Installing Mongosh (MongoDB Shell)
Since I am using MongoDB Atlas (cloud-based) for my database, I need to install the MongoDB Shell to connect with it and verify the database connection. This allows me to interact with the database efficiently without needing a full local installation of MongoDB.
Follow these steps to install the MongoDB Shell (Mongosh) on your EC2 instance:
For Ubunut/Debian-based Systems:
Update the package Index:

Import the GPG key: This ensures that the packages you download are from a trusted source. Use the following command for MongoDB:

Create a Repository File: Create a file for the MongoDB Shell repo:

Update the Package Index Again:

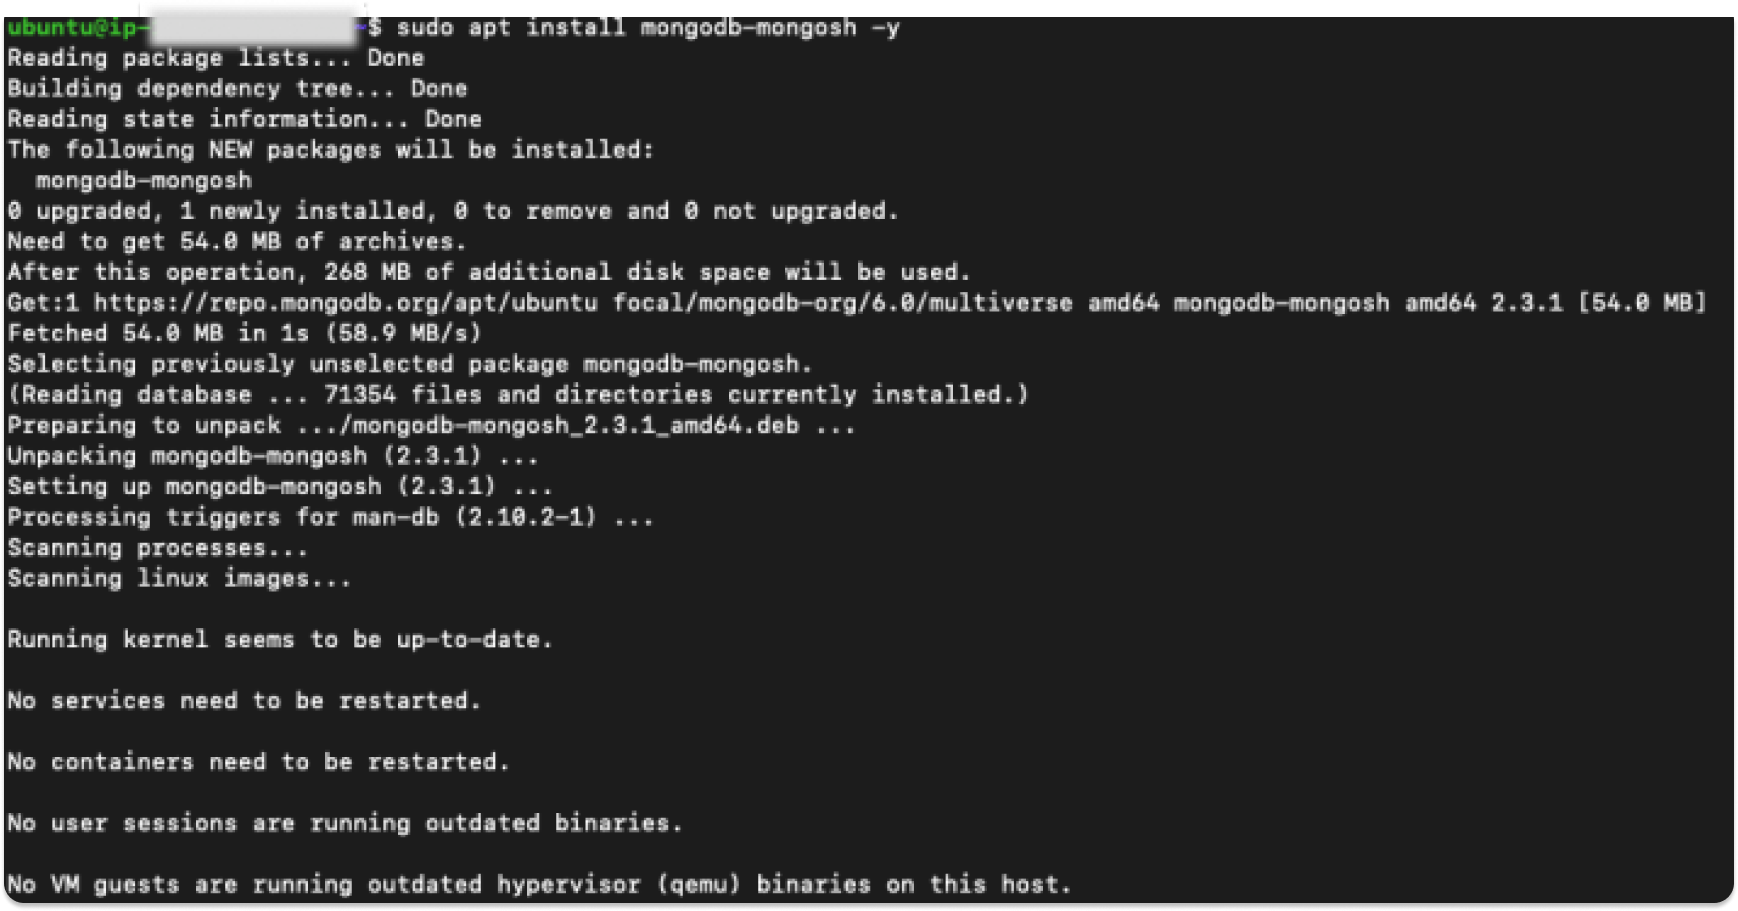
Install Mongosh

2. Whitelisting the EC2 IP Address in MongoDB Atlas
To connect your MongoDB Atlas database with your EC2 instance, you need to whitelist the EC2 instance's IP address. Go to the "Network Access" section in your MongoDB Atlas account and add the IP address of your EC2 instance to the allowed list. This will enable secure communication between the EC2 instance and your database.
Navigate to Network Access and click on the “Add IP Address” button.
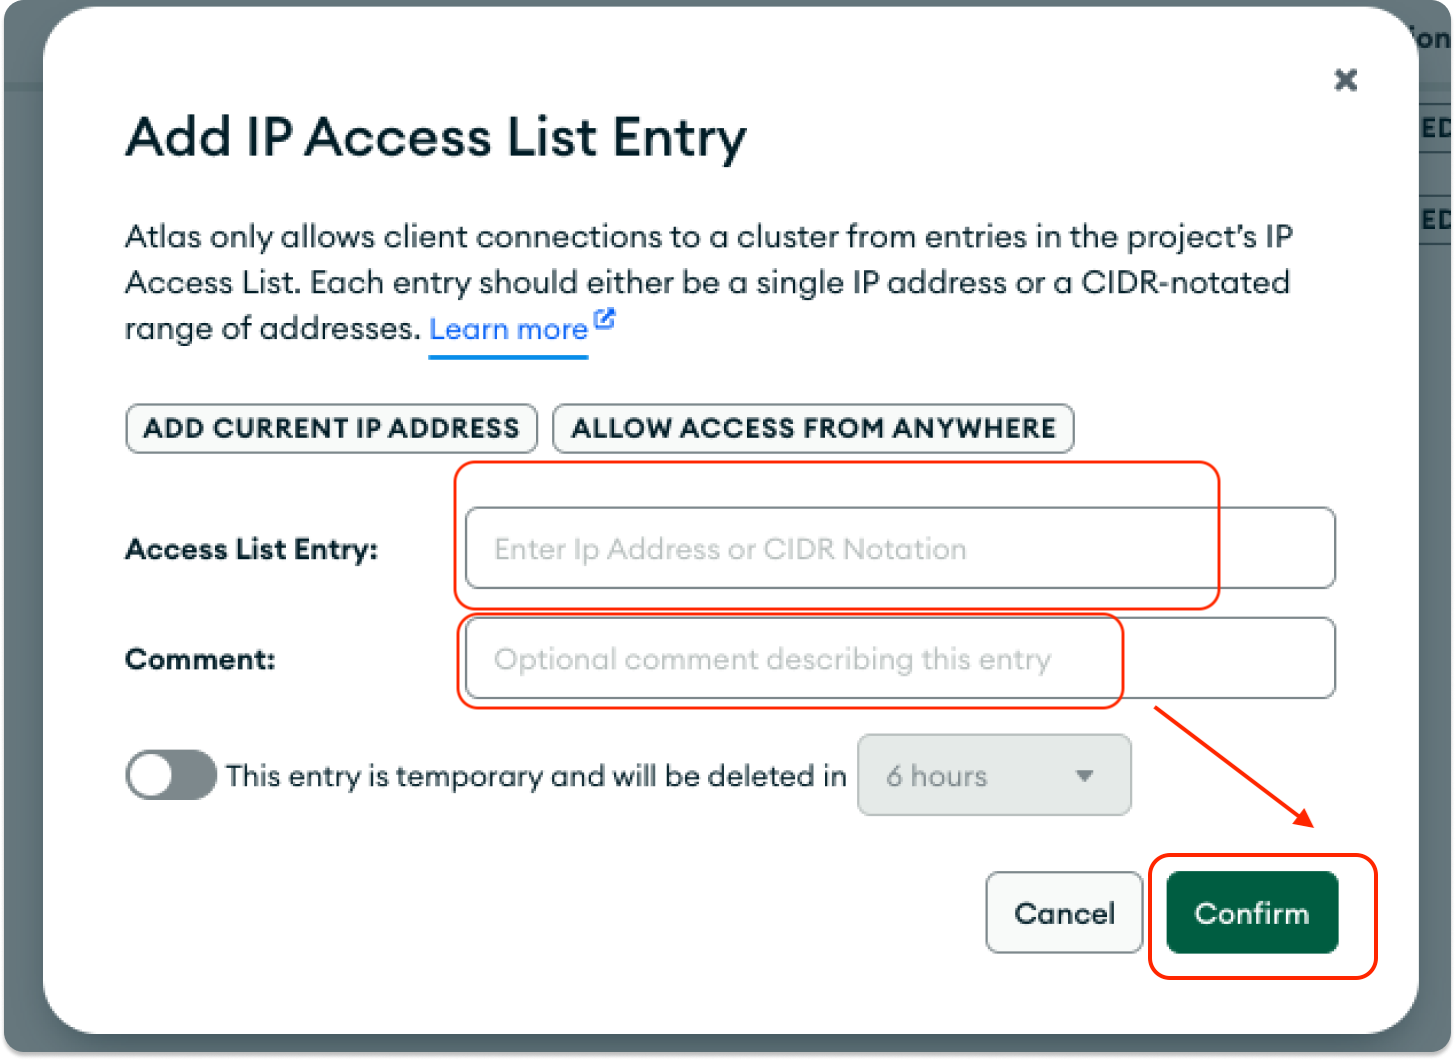
After adding your EC2 IP address, you should see it in the IP Access list.

Once you have installed mongosh and whitelisted your EC2 IP address, you can connect to your MongoDB Atlas cluster using the connection string provided by Atlas. The connection string will look something like this:

4. Preparing the App for Deployment
In this step, we will configure our Node.js application to serve our React.js application. Our goal is for the React application to operate within the Node.js environment, allowing both to run together from our Node.js server rather than simultaneously as separate applications.
To do this, we will first create a path in the server.js file that will handle serving the static files generated by the React build process. Here’s the code we will use:

Importing Path Module: The code starts by importing the path module from Node.js, which is used to handle and transform file paths.
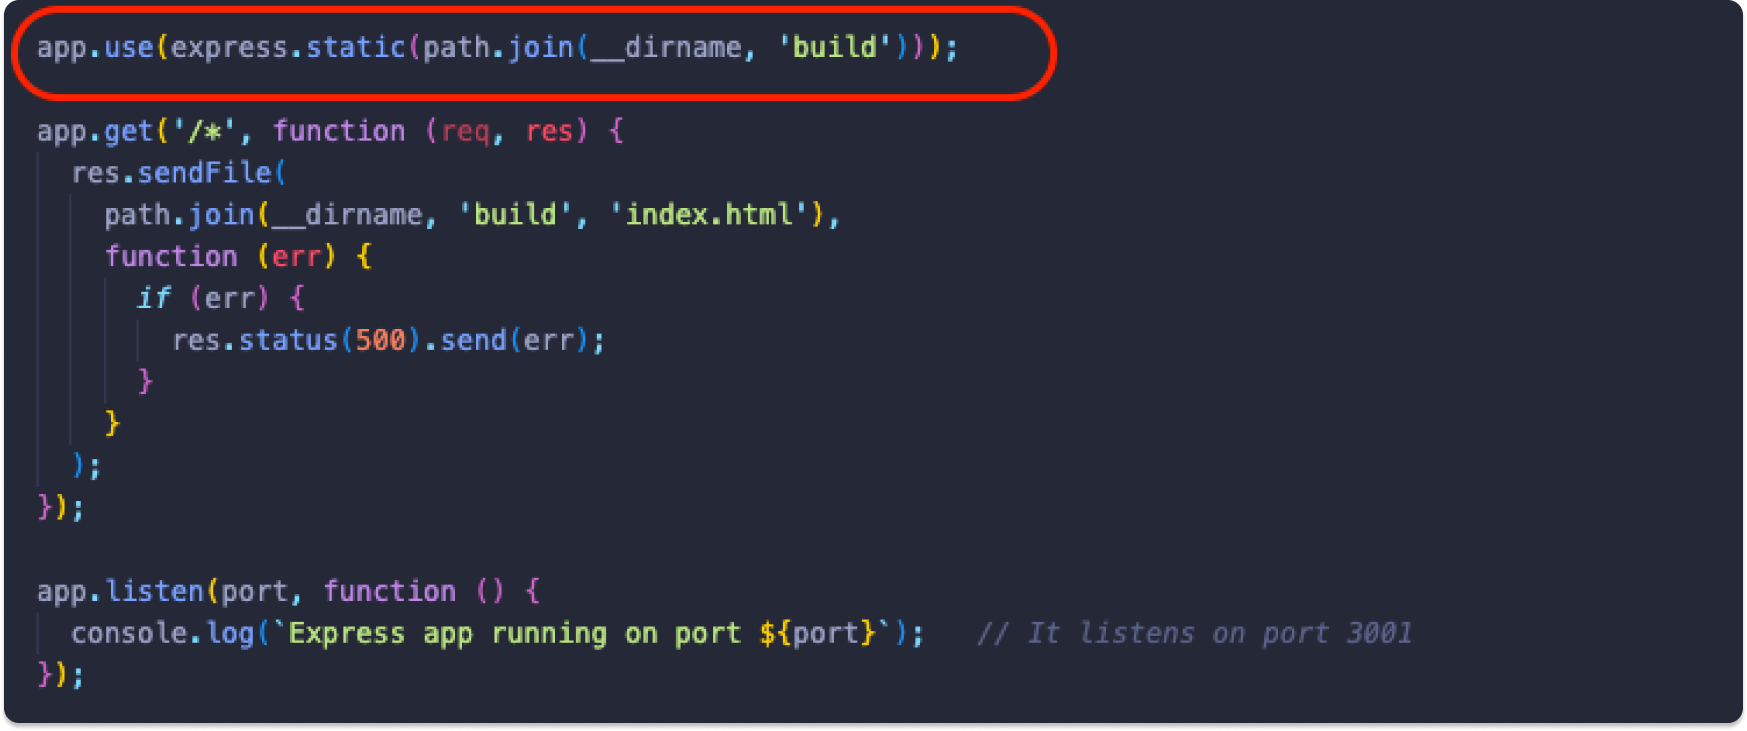
This code enables our server to navigate to the build directory of the React application and fetch the static assets contained within it. Once these assets are retrieved, the server serves them to the client using a route defined in our Express application. Essentially, the express.static middleware handles the delivery of static files, ensuring that when a user requests a resource, the server can efficiently respond with the appropriate files, like HTML, CSS, and JavaScript, necessary for rendering the React application.
Now, we are using a single port to serve all the files. After implementing these changes, be sure to commit them.
Cloning the repository to EC2
Create a Projects Directory and clone the repository into that directory.


Install all the dependencies specified in the package.json file to ensure your application has the required libraries to function properly.

Install the Express framework

The npm run build script prepares an application's code for production.

After running all the commands and building your app for production, you will need to create a .env file to store your environment variables. This file will securely hold sensitive configuration data required for your application to run.
Create an .env file to store your environment variables.

Add the required environment variables to your .env file to ensure the proper configuration of your application.

The content should look something like this:

Now, we will run our application using PM2. Run pm2 and name it with the following command:

This will start your server.js file using PM2 and label the process as "mern-app" for easier management.
After executing this command, you should see a welcome message similar to the following.
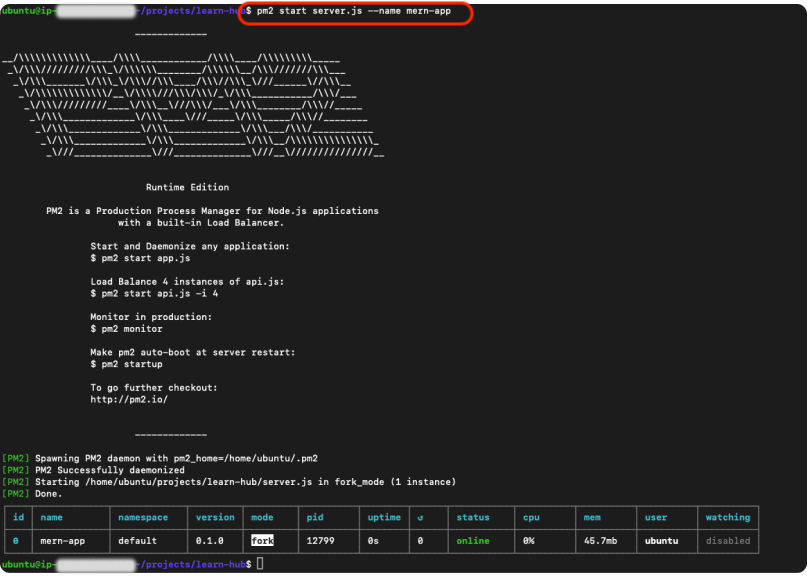
To check the logs for your application running with PM2, you can use the following command:

This command retrieves and displays the logs for the application named mern-app. If you want to see the logs for all applications managed by PM2, you can simply use:

5. Configuring the Nginx server
To check your current Nginx configuration, you can run the following command in your terminal:

In this command, I am using Nano as the text editor, but you can also opt for vim or any other text editor you're comfortable with. This file typically contains the default configuration settings for Nginx.
Once you open the file, you should see the default configuration, which may look something like this:
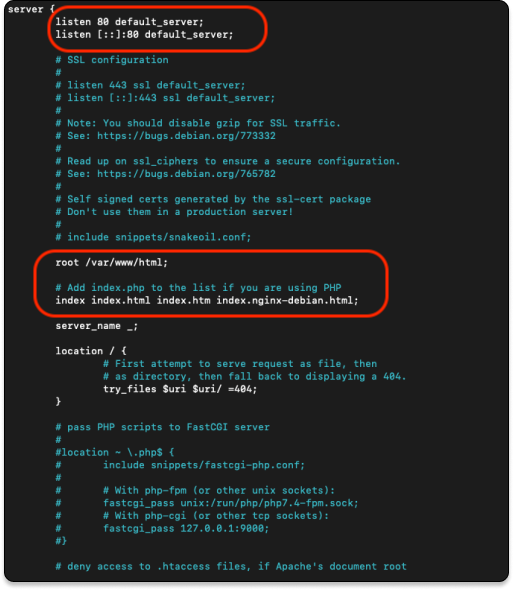
This basic configuration specifies that Nginx will listen on port 80 and serve files from the /var/www/html directory when accessed via the localhost.
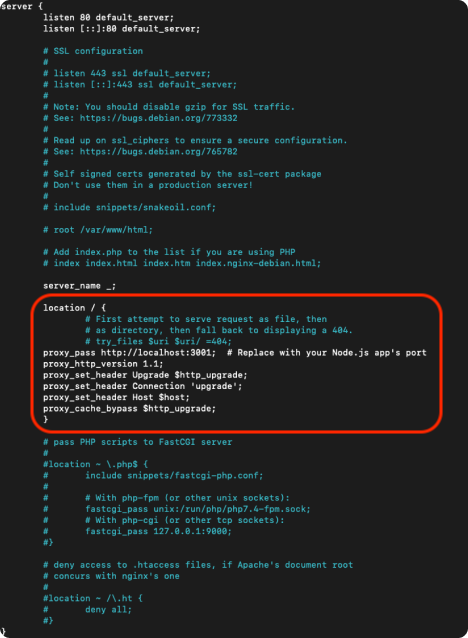
Now, we will modify the Nginx configuration with the following code to establish a reverse proxy that directs traffic from the Nginx server to our Node.js application running on port 3001:
Add the below code inside the appropriate server block.

Now your configuration file should look like this:
Test the Configuration: After making changes, it’s essential to test the configuration to ensure there are no syntax errors. Run:

Reload Nginx: If the test is successful, reload Nginx to apply the changes:

Access Your Application: Once reloaded, your application should now be accessible through your Nginx server, allowing it to handle requests and proxy them to your Node.js application seamlessly.
Congratulations! You have now successfully deployed your MERN stack application on AWS. With your app live and running, you can explore further enhancements and optimizations. Happy coding 👩💻 !